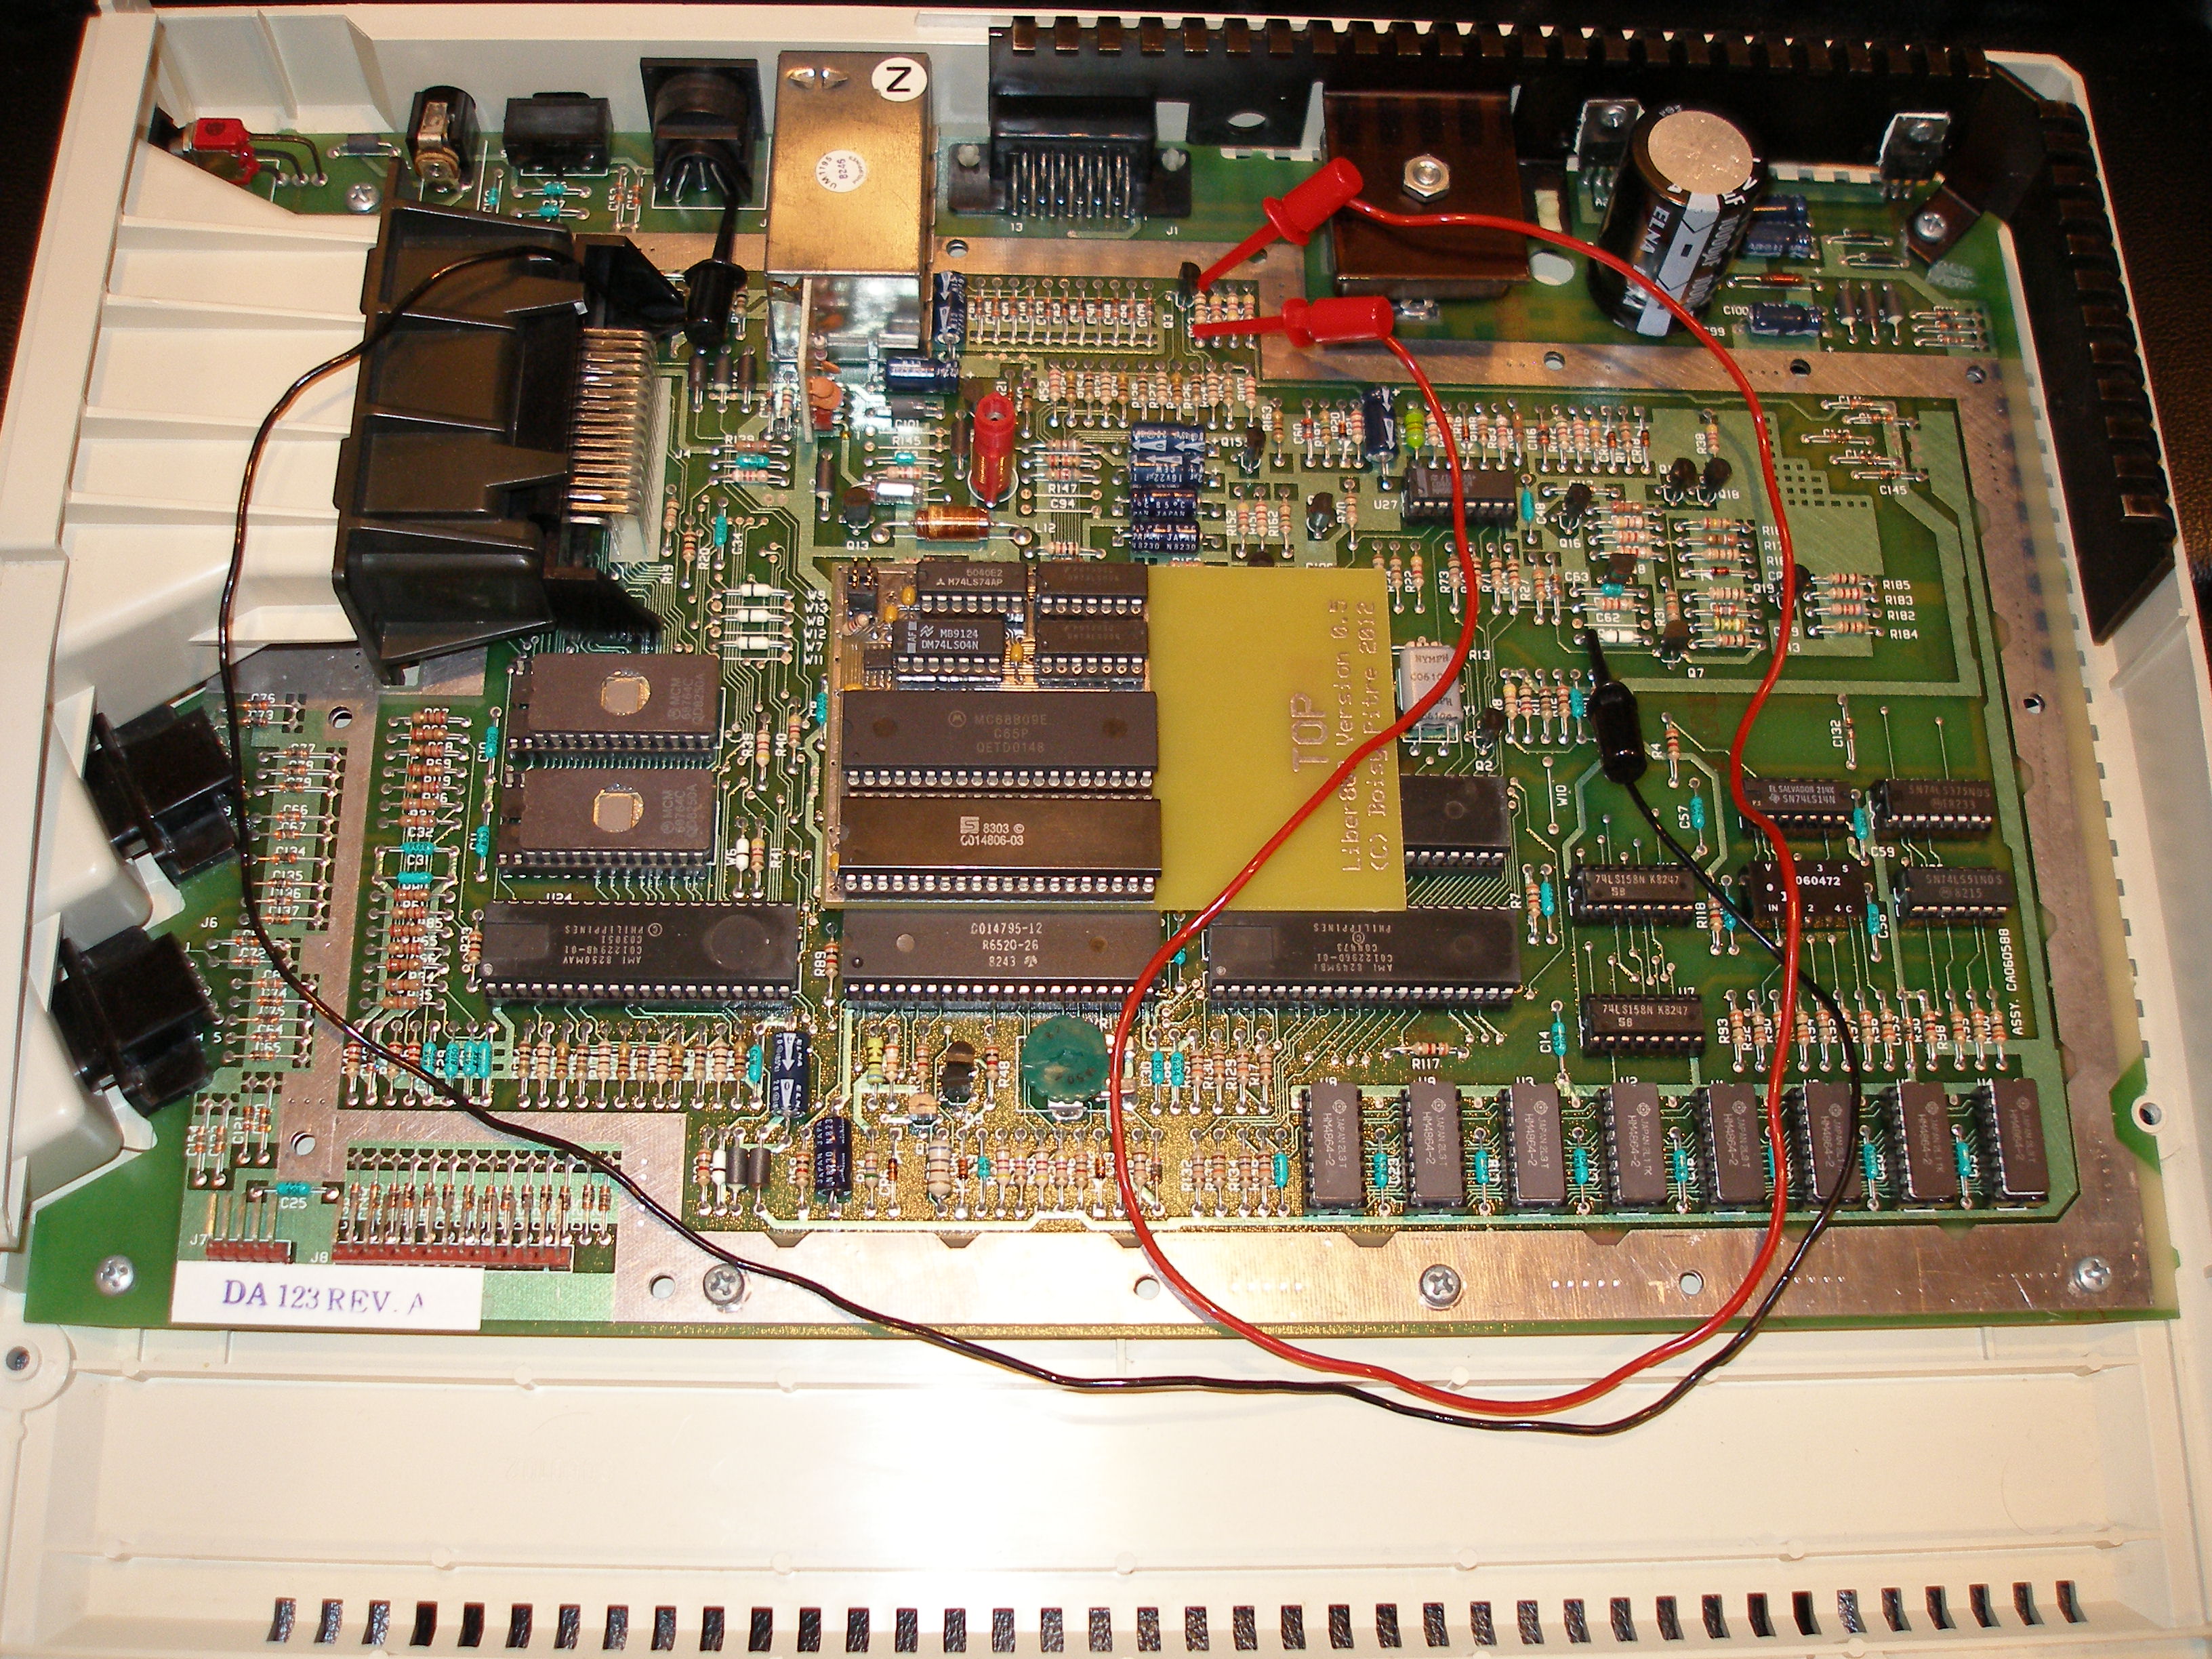
Those of you following this blog early on may have noticed that I abandoned the Atari XEGS system as a platform for the Liber809 due to an issue that I was having with getting the system working in All-RAM mode. My initial suspicion was that there was some subtle timing issue with the Liber809 board that caused it to fail in the XEGS. Any write to $BXXX would cause what I *thought* was a write to $DXXX.
In actuality, writes to $BXXX were going to $FXXX and blowing away the bitmap font and display list that were setup there. I confirmed this, then asked the folks on atariage.com for some assistance. After looking at the schematic, it became apparent that either the two 4464 DRAMs or the FREDDIE chip were at fault.
I spent some time this evening desoldering and socketing the two 4464s, then replaced them with known working extras that I had. After hooking everything up, the problem still persisted. Any attempt to write to $BXXX was actually going to $FXXX. That left the FREDDIE as the possible culprit. All address lines go into that chip, and it's responsible for reading/writing/refreshing the DRAMs. It seemed like the next logical step.
Since I don't have spare chips around, I turned to my trusty 130XE which had its FREDDIE soldered onto the board. I carefully desoldered the chip and removed it gently, then inserted it into the already socketed FREDDIE location on the XEGS and started it up... SUCCESS! The XEGS did not have any problems booting with the Liber809 ROM and 6809 processor. NitrOS-9 came right up and I was able to interact just fine.
So it appears the FREDDIE that was in the XEGS was "sticking" A14 somehow. Now to find a replacement FREDDIE.
On another note, my 130XE keyboard mylar was failing. Keys were simply not working. I found a supplier of replacement mylar keyboards, http://www.best-electronics-ca.com, and sent an email. They were very prompt in responding, and I even picked up replacement key cups for both the 130E and XEGS keyboards, which eliminate the "spongy" feel. I ordered on a Friday and the parts were here on Monday. I then installed the keyboard mylar and key cups, and boy did it make a difference! Check these guys out. They are EXCELLENT Atari product suppliers!
Tuesday, August 7, 2012
Thursday, May 24, 2012
Liber809 at the CoCoFest
This past weekend I attended the 21st Annual Chicago CoCoFest and brought over the Atari 130XE as well as a passel of assemble Liber809 boards. Interest in the project was high even though attendance was obviously geared toward the Color Computer.
On Saturday afternoon I gave a presentation on the development of the board and the software. There were good questions asked, and everyone seemed pleased.
Currently, we have plans to attend both VCF Southwest and the VCF Midwest this year. Our hope is to have the Liber809 board expanded to other 8-bitters by that point. Stay tuned.
Sunday, May 6, 2012
Up and Ready for Sale
Today I updated the Cloud-9 website at www.cloud9tech.com to reflect the fact that the Liber809 is now shipping.
Several folks have asked what is required to really make use of the Liber809. A SIO2PC device, which mates the Atari SIO port to a PC via a USB cable, is required to do any loading of applications into the Atari itself. SIO2PC devices are available at various places on the Internet.
Several folks have asked what is required to really make use of the Liber809. A SIO2PC device, which mates the Atari SIO port to a PC via a USB cable, is required to do any loading of applications into the Atari itself. SIO2PC devices are available at various places on the Internet.
Monday, April 30, 2012
And Another One Down...
This evening I verified that the Atari 130XE works great with the Liber809 board (thanks to Mike Rowen for graciously donating the system to me for testing). Since the latest incarnation of the Liber809 is so compact, I was able to put the Atari 130XE together, case, screws and all. Makes it look all natural!
You can see how it looks, and even watch it boot NitrOS-9 from DriveWire on this YouTube video.
You can see how it looks, and even watch it boot NitrOS-9 from DriveWire on this YouTube video.
Almost Ready...
The last 5 days or so have been spent putting together the board and testing. Three trace cuts and three added wires later, the board is coming up on the Atari 800XL here on the bench. The trace cuts and wires were needed to work around omissions in the latest board run (our fault, not the PCB manufacturer's).
 Because of this extra post assembly work, I've decided against selling kits and will instead sell entire boards already put together. This allows some quality control and assures me that what I'm sending out actually works.
There's still an issue with the board working the Atari XEGS, so we're trying to pin down the proper equations to deal with the timing issues surrounding that system. Once that's in place, the boards will start going out the door.

There's still an issue with the board working the Atari XEGS, so we're trying to pin down the proper equations to deal with the timing issues surrounding that system. Once that's in place, the boards will start going out the door.
Thursday, April 26, 2012
They're Here....
The boards arrived this morning via FedEx and they look great. I'm still waiting on another order of parts to arrive before I begin to assemble and test the board. That should happen early next week. Assuming all goes well, we'll start making kits available shortly thereafter.


Thursday, April 19, 2012
Coming Together
The absence of a post over the last couple of weeks shouldn't be an indication that nothing is going on.
On the contrary, things are on the move. A few days ago, we sent final artwork over to the PCB manufacturer and should be getting boards next week. Parts have been ordered and I will be assembling a number of boards. The preferred method of selling the Liber809, however, will be in kit form.
The product will be sold through www.cloud9tech.com. A final price hasn't been set yet, but that should be set soon. In the mean time, anyone interested in one of these boards, either in kit or in assembled form, can email me to be put on the list.
Monday, April 2, 2012
Progress On The Software Side
This evening I spent some time reworking the NitrOS-9 port. The change in the Liber809 boot ROM made it necessary to do some modifications to the kernel to accommodate the new loading style. But now all is good and we're booting NitrOS-9 Level 1 on the Atari 800XL.
Which brings me to Slor's excellent demo. Fuji started life out as a blob of code loaded from the ROM load routines via DriveWire. It was later modified to be position independent, but still had absolute references and self modifying code, neither of which are welcome in an OS-9 environment.
I spent some time with Slor tonight, reworking Fuji to actually run as an OS-9 executable. It's not quite the good NitrOS-9 citizen that it should be, but with a bit more work, we will be able to run it from the shell, then quit it at our leisure and return back to the OS.
Finally, I'll be doing a KeyNote presentation on the project at the upcoming CoCoFest (http://www.glensideccc.com). I plan on making this a very thorough and detailed presentation and will post the notes when I'm done.
Friday, March 30, 2012
Back in the Saddle
As I mentioned in a previous post, work and other tasks have pretty much sidelined the Liber809 project. However, I'm spending some time this weekend to rework the NitrOS-9 port based on several pieces of good news:
- The Liber809 board had stopped working for some inexplicable reason. As it turns out, a piece of solder flake had found its way onto the trace from the Maxim DS1100 that leads to the Q clock on the 6809, leaving it perpetually grounded. Needless to say, I'm going with solder masked boards from now on.
- The XEGS had timing issues with the firmware going into all-RAM mode. The ANTIC was picking up writes to addresses outside of its range of $D000-$D7FF. We have theories on this subtle timing problem, but reports from others that the 800XL and 1200XL worked fine in all-RAM mode has us thinking this is something unique to the XEGS.
Sloopy, a member of the AtariAge forums, sent over an Atari 800XL which I readily disassembled. After some mucking around, the Liber809 board came up, and indeed worked well, even in all-RAM mode. Slor's excellent Liber809 demo in the previous post came up just fine, sound and all.
With a solid, reliable Atari system running the Liber809 board, I can now focus on bringing up NitrOS-9 through DriveWire, which is how I envision the majority of folks will want to use the operating system. So I've carved out some time this weekend to do just that.
Wednesday, March 28, 2012
Demo Time
Slor sent over a link to a YouTube video which shows an impressive demo of the Liber809 in his Atari 1200XL. Check it out here.
Thanks Slor! Great job!
In other news, work has had me sidelined for a while on the project, but we are still working on the next revision of the board. More news as it comes.
Thanks Slor! Great job!
In other news, work has had me sidelined for a while on the project, but we are still working on the next revision of the board. More news as it comes.
Tuesday, March 6, 2012
1200XL Success
We've verified that another machine besides the Atari XEGS works with the Liber809. Slor (pseudonym), a guy from the Atari group, purchased one of the Liber809 prototypes and has installed it in his Atari 1200XL. We spent some time last night going over test code with DriveWire 4 Server. Here's a screen shot of it in the 1200XL:

I've got some tidying up to do on the Liber809 ROM for the Atari, but expect to get all of the bugs worked out. We're not sure on the final design of the Liber809 board yet, but Gary's working on it, so we'll have an update soon.
I've got some tidying up to do on the Liber809 ROM for the Atari, but expect to get all of the bugs worked out. We're not sure on the final design of the Liber809 board yet, but Gary's working on it, so we'll have an update soon.
Monday, March 5, 2012
Liber309?
The Motorola 6809 has a cousin. Yes, her name is 6309. Actually the 6309 is a clone of the 6809 and is/was made by Hitachi. For years, CoCo guys were sticking them in their systems to replace the 6809 because the 6309 is made from a CMOS process and runs cooler and takes up less power.
It took a Japanese guy named Hirotsugu Kakugawa to write a post to the comp.sys.m6809 Usenet newsgroup in 1992 entitled "A Memo on the Secret Features of 6309" to open up the potential of this chip to the CoCo world (see this link for the original message). It turns out that the chip that a lot of CoCo users were running for years had extra registers, 16 bit multiply and 16/32 bit hardware divide instructions, plus other cool bit manipulation and block copy instructions. Not only that, but the chip could be put into a mode that would shave 1 cycle off of many instructions.
Soon, intrepid developers began writing software to take advantage of the new-found power of the 6309, including updating Microware's OS-9 operating system (where NitrOS-9 got its name). Performance was improved greatly and it set new speed records for the CoCo.
You would expect that the 6309 would also work in the Liber809, and that was the plan, but for a few weeks now, I was aware of a problem. The 6309 wouldn't work in the Liber809 board, neither the Frankenproto wire beast that I handmade, nor the prototypes that came in last week. The 6809 ran fine, but the 6309 would just lock up the machine.
It turns out that gate delays caused a glitch in the E and Q clocks. Gary noted this in one of the logic analyzer shots I sent over to him, and surmised that switching two pins on the 7400 would cause the signal to arrive two gate delays earlier and eliminate the clock spike. Today for lunch I quickly rewired the prototype and tried the 6309, and sure enough it came up. So now the Liber809 also works with the 6309.
Speaking of prototypes, both have been sold and are getting into the hands of their new owners as we speak. Some additional testing on their end will solidify things and we'll soon move to a larger run of boards that are optimized for both part count and space.
Thursday, March 1, 2012
Dual CPU Mission Accomplished
Today I received the rest of the parts in the mail to finish assembling the prototype boards. Since I only had lunch time to do some work on the project, I quickly got down to soldering. After carefully checking my work for proper continuity with an Ohm meter, I placed the chips in, set the jumpers and voila! The Liber809 board came up!
I turned off the Atari XEGS, programmed the ROM emulator with the contents of the original Atari 32K ROM, then set the two jumpers into the alternate position. When I powered the Atari up, the familiar READY prompt came up into Atari BASIC.
Now that we have a solid board running, the plan is for more testing and retesting to make sure everything is super stable.
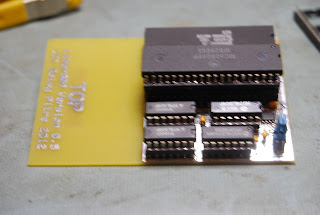
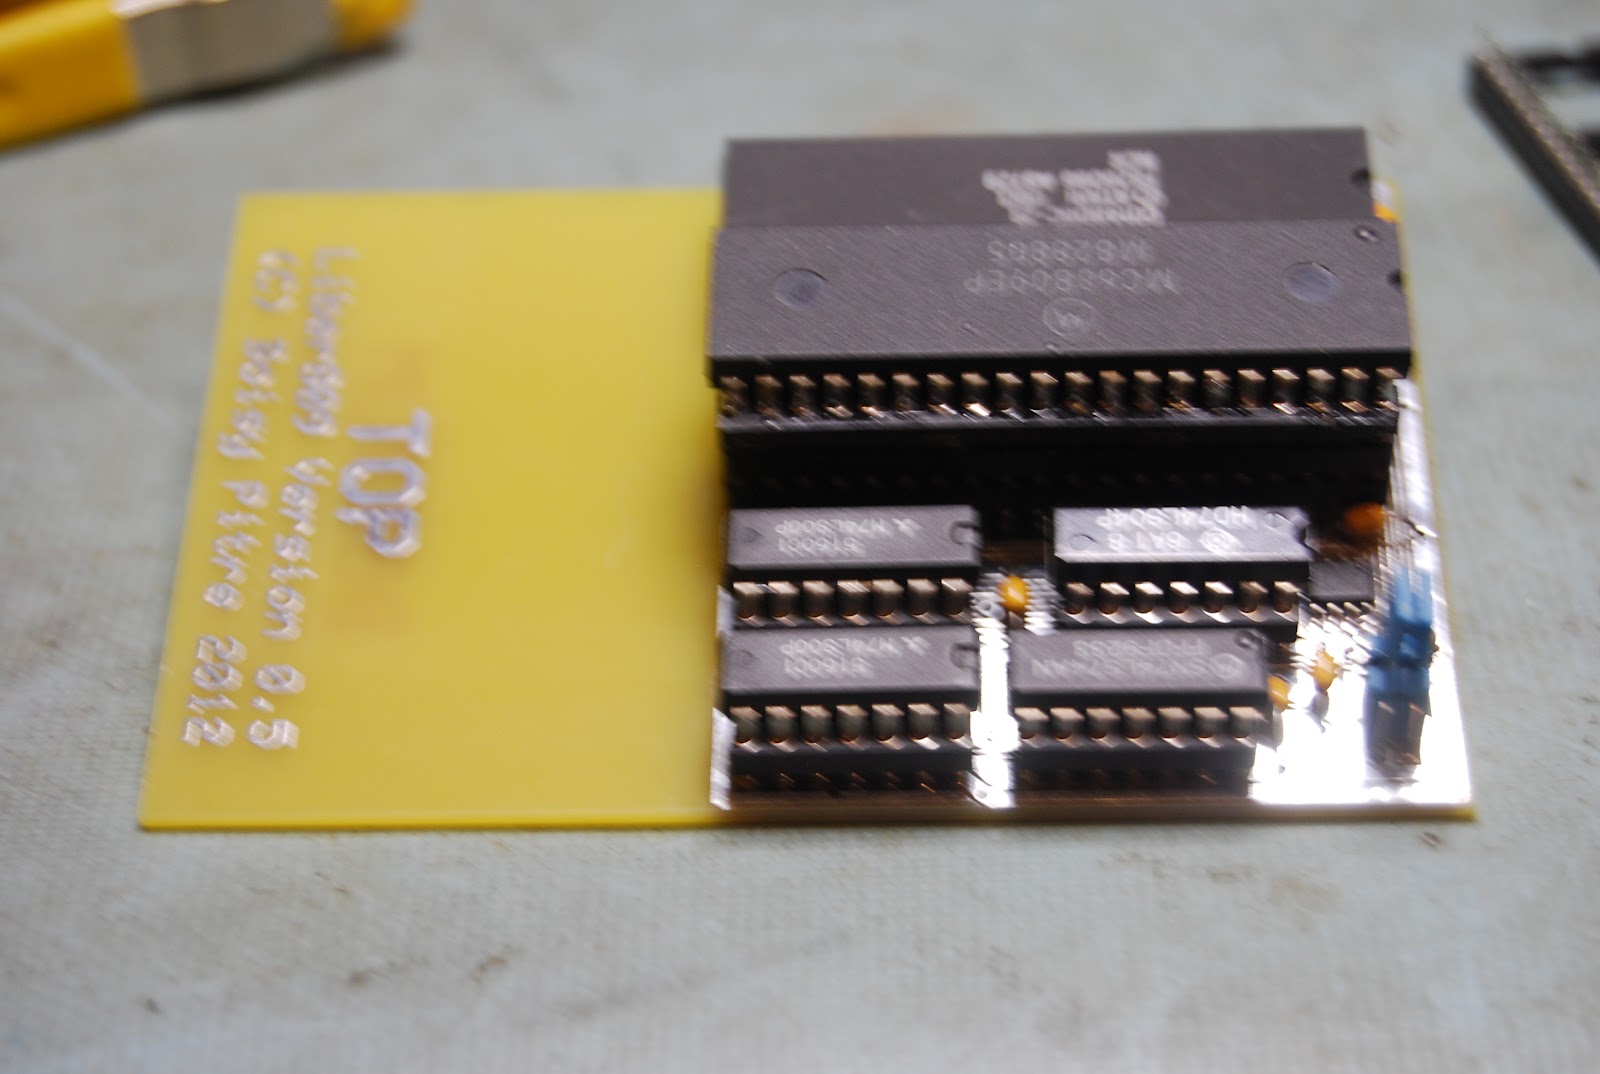
As you can see in the pictures below, the board is a little long due to the specific size requirements that were placed on us by the prototype manufacturer. The final board will be optimized, and we also expect to drop the number of support chips down as well.
As I have time, I'll assemble the other two prototypes then get them off to their respective buyers.


I turned off the Atari XEGS, programmed the ROM emulator with the contents of the original Atari 32K ROM, then set the two jumpers into the alternate position. When I powered the Atari up, the familiar READY prompt came up into Atari BASIC.
Now that we have a solid board running, the plan is for more testing and retesting to make sure everything is super stable.
As you can see in the pictures below, the board is a little long due to the specific size requirements that were placed on us by the prototype manufacturer. The final board will be optimized, and we also expect to drop the number of support chips down as well.
As I have time, I'll assemble the other two prototypes then get them off to their respective buyers.


Wednesday, February 29, 2012
Prototypes And 57.6Kbps!
The three prototypes came in today, and I spent some time this evening starting the assembly process. Not all parts are in yet, but they are on their way. So far I have the capacitors and resistors I need, plus several of the Maxim DS-1100Z+175 chips. Soldering these little buggers on the board isn't easy!
 Add to the fact that most of the board is an unmasked ground plane (for electrical stability) so I have to be extra careful in my soldering not to create any shorts. As the parts trickle in the next couple of days, I should be able to move away from the Frankenstein wire beast that I'm currently using (but which is now remarkably stable since I carefully went over it). The other two boards are spoken for, and I'll build them as well.
Another bit of news... I'm now running the SIO on the Atari XEGS at 57.6Kbps and tweaked the FTDI chip in the adapter to minimize its transmit delay so we can squeeze every bit of performance out of the thing. It's holding up quite well, except for a few glitches that I hope to nail as I solidify the boot ROM and get a stable prototype in place.

Another bit of news... I'm now running the SIO on the Atari XEGS at 57.6Kbps and tweaked the FTDI chip in the adapter to minimize its transmit delay so we can squeeze every bit of performance out of the thing. It's holding up quite well, except for a few glitches that I hope to nail as I solidify the boot ROM and get a stable prototype in place.
Tuesday, February 28, 2012
SIO, You're A Tricky Devil...
I had a little bit of time over the weekend to buffet up the SIO routines. While they still aren't giving 100% error-free transmission in all cases, they're a lot better than my first cut. I used the 6502 code that this guy wrote (http://www.horus.com/~hias/atari/) as a guide to the 6809 version, which has proven pretty stable at 38,400bps.
So with that in place, I can now boot into DriveWire and access disk services.
The next thing to tackle is a more stable booting environment. Currently my boot ROM is just a hacked together lump of code, but I'm planning on bringing Brett Gordon's Forth-based CoCoBoot into the picture soon.
Boards should be here mid-week, and other parts are trickling in day by day from UPS and the post office. Hopefully this weekend I'll have some time to put together a board.
Saturday, February 25, 2012
PIA = Pain In the Ass
I swear, it's the little things that trip you up. I fought two battles today with the continuing effort to get the NitrOS-9 port more smoothly working with the Atari XEGS. The first was getting the SIO port to work reliably. The second was getting the Atari into all-RAM mode. Both were necessary to bring the project forward.
Some background: booting NitrOS-9 from ROM is fine for development, but to make Liber809 convenient as a product, people don't want to burn ROMs every time they want to reconfigure the OS (not everybody has a ROM burner). The ideal situation is to have a bootstrap ROM installed in the ROM socket of the Atari. The code in that bootstrap ROM would pull in additional code from some external source (like a disk drive). The ROM code wouldn't change, and the malleable code on the disk would be easy to update, etc.
Well, the obvious solution these days is a Mac, Linux or PC based server that acts as a virtual disk server... like DriveWire. It turns out that the Atari guys have their own SIO protocol and server-side software, but since I waned to turn out something quick, and being more familiar with DriveWire, I decided to start with that.
So the first battle was to understand and tame the SIO. POKEY, which is one of the chips on the Atari, handles serial communications and has an internal shift register so all the software needs to do is write a byte and read a byte, etc. But it's a little tricky, and I learned that. It was an exercise in frustration trying to get reliable communication to the DriveWire 4 server at 38,400 bps, but after studying some example 6502 code and doing some experimentation, I finally got something that worked. So now my boot ROM is happily pulling sectors off of DriveWire server. Sloopy (a guy on the Atari forums) was kind enough to drop an SIO to USB adapter in the mail to me, which was critical in getting this to work. Thanks Sloopy (not Sloppy!)
Now for the second battle. A critical component in getting the OS loaded is to tell ROM to get the hell out of the way at the right time. This is called "all-RAM" mode, and the Atari is capable of doing it. However, for the life of me I could not get it to work. I tickled bits, tried standing on my head, etc. But nothing worked. The helpful guys on the Atari forums gave me some hints and clues, and while working through everything, we came to the realization that the PIA needed to be initialized. After more experimentation, I was finally able to get all-RAM mode working, albeit with a different value than what the documentation expects to be placed into the PIA's port register. That's another battle for another time....
So the bottom line is that NitrOS-9 on the Atari XEGS is now booting from the DriveWire 4 server running on the Mac. This is *BIG* because it gives users an easy way to introduce code into the system. It also further proves out that the Liber809 design is continuing to perform well.
Friday, February 24, 2012
All Night Long
Frustrated with the finickiness of the spaghetti prototype, I spent some time last evening buzzing out and resoldering wires on the prototype board. I found a few questionable places that could have been contributing to the problem and tightened up connections.
Another cause of the possible flakiness: the 68B09E that I'm using in the machine socket was desoldered from a CoCo 3 years ago. The pins are noticeably shorter and the contacts they make into the machine socket holes in some places are questionable. I flared out the pins slightly so that they would make a better contact in the holes and seated the microprocessor more firmly.
After that, I placed the prototype back in the 6502C socket on the Atari XEGS and things seemed more stable. I loaded a bootfile into ROM, booted NitrOS-9 and left the debug command running all night long.
This morning I arrived in the office to find that the prompt was still showing, the video was still sane, and the XEGS was still up and running. So it appears that the rework I did on the prototype cleared up those issues.
Another accomplishment was to finally sort out the clock problems that I was having with NMI. It turns out that it was a simple coding error, and I fixed it right up. Now, clock module is called during the kernel's initialization. The clock sets up a vector, then tells the ANTIC to fire off an NMI every vertical blanking interval (1/60 of a second). The vector routes the NMI to a short handler which then redirects it to the vector that was populated by the clock module. This vector handles the software clock (increments seconds, then minutes, then days, and so on), and also polls the virtual interrupt table, a feature that NitrOS-9 has for devices to use the clock interrupt as a pseudo-interrupt source. So now NMIs are firing 60 times a second and keyboard interrupts are working along with that.
With all of that activity going on and the computer staying up strong for 12 hours running, I would say that things are looking quite well.
Thursday, February 23, 2012
Of Prototypes and Shout Outs
I just got off the phone with Gary, who completed the design of revision 1 of the Liber809 board. Three prototype boards will be ordered and should be in late next week or early the week after. The plan is to populate and test them to further improve the design and work out any remaining issues (there don't appear to be any). I'll keep one around and get the other two into the hands of people who can take the project a bit farther along.
After that, we'll look at a larger run that will be sold in kit form through Cloud-9.
I thought I would dedicate the rest of this blog post to the people and products that made the project a success. Nothing is created in a vacuum, and it was certainly true in this case. So thanks to:
After that, we'll look at a larger run that will be sold in kit form through Cloud-9.
I thought I would dedicate the rest of this blog post to the people and products that made the project a success. Nothing is created in a vacuum, and it was certainly true in this case. So thanks to:
- My wife, for putting up with my being holed up in the shop late into the evenings while I hammered this thing out.
- Gary Becker for his significant contributions to the design of the Liber809, doing the board layout and just generally being available for questions and the like. Without Gary's help it would have taken much, much longer for me to complete this project.
- Mark Marlette and James Daggett for their input during the electrical mating phase of the project.
- The great folks on the AtariAge forums (www.atariage.com/forums) for the help and encouragement., including Rybags (thanks for all of the 6502 test code!) and sloopy (for the SIO2PC adapter and technical guidance on the Atari stuff).
- The CoCo guys on the Malted Media mailing list for championing me forward.
- tschak, dmlloyd, syscall, a8isa1, joey_z and others in the Atari IRC group who helped me decipher the ANTIC and other Atari hardware.
- My trusty iMac (www.apple.com) which powers the cross assemblers and other tools which made the NitrOS-9 port go quick and easy. Gotta love Apple computers.
- Intronix (www.pctestinstruments.com) for their LogicPort analyzer, which made this project SO much easier (and fun!)
- Craig Moates (www.moates.net) for his awesome Ostrich 2.0 ROM emulator which saved me tons of development time.
- The ToolShed software (http://sourceforge.net/projects/toolshed/) and specifically, the mamou 6809 cross-assembler which rocked the house.
- NitrOS-9 (www.nitros9.org) for being such a cool little OS, and to the guys at Microware (Larry, Ken, and Robert) who created OS-9 for the 6809 over 30 years ago...
I hope I didn't miss anybody.
Wednesday, February 22, 2012
Excuse the Interruption
Well, I hit another milestone... the POKEY chip on the Atari XEGS can be setup to send an interrupt when a key is pressed. After spending some time this evening figuring out how to orchestrate that, and getting re-accustomed to NitrOS-9's IRQ polling system call, POKEY is doing its thing and the OS is handling it right along. I can now type commands at the shell prompt and have them execute. Also, notice the scrolling is working as well.
Also, the kernel is now scanning modules from $C000-$CFFF and $D800-$FFFF, skipping the $D000-$D7FF I/O range. It takes a few extra steps to build a ROM image to cope, but usable ROM space for NitrOS-9 is now up to 14K.
What Hath Been Wrought?
Now that the board is working pretty well, I thought it would be a good time to sit back and reflect on exactly what has been accomplished here, as well as looking at what the Liber809 is and what it isn't.
The first thing I want to talk about is the name: Liber809. This came to me some years ago when I was first planning the project. The name is, of course, an amalgamation of the words "liberate" and "6809". The idea was to convey a sense of freedom and liberation... that the 6809 could actually run on something outside of just the CoCo. The choice of name was never meant to imply that systems who can use the 6809 are somehow liberated from the 6502.
Second, some people have used the term "CoCoTari" or similar names to describe the Liber809's success in the Atari XEGS. I want to discourage use of that term, because this project has more to do with the 6809 than the platform that it was popular on. Sure, the CoCo has the 6809 and also has NitrOS-9, but both of these elements existed outside of the CoCo. There were other 6809 systems back in the day that ran OS-9, such as the GIMIX, Smoke Signal, and others. And while the CoCo was certainly the jumping point for me to get this project going, it should in no way be seen as an attempt to meld the two systems together per se.
With all of that said, there were a few goals that I aimed to accomplish with this project:
Pretty much every one of these goals has been met to some degree. But this is just the start. Getting the hardware working and proven is one thing. Now the real challenge is to see if people will take it to the next level with software that takes advantage of this new platform.
The first thing I want to talk about is the name: Liber809. This came to me some years ago when I was first planning the project. The name is, of course, an amalgamation of the words "liberate" and "6809". The idea was to convey a sense of freedom and liberation... that the 6809 could actually run on something outside of just the CoCo. The choice of name was never meant to imply that systems who can use the 6809 are somehow liberated from the 6502.
Second, some people have used the term "CoCoTari" or similar names to describe the Liber809's success in the Atari XEGS. I want to discourage use of that term, because this project has more to do with the 6809 than the platform that it was popular on. Sure, the CoCo has the 6809 and also has NitrOS-9, but both of these elements existed outside of the CoCo. There were other 6809 systems back in the day that ran OS-9, such as the GIMIX, Smoke Signal, and others. And while the CoCo was certainly the jumping point for me to get this project going, it should in no way be seen as an attempt to meld the two systems together per se.
With all of that said, there were a few goals that I aimed to accomplish with this project:
- Get my hardware chops up and learn the hardware of another platform.
- Bring the 6809 to other home computing platforms with first-rate graphics and sound features. The CoCo has always been hobbled with less than ideal sound and graphics. The CoCo 3 did manage to elevate the graphics a bit, but sound still lacked. And yes, we made do with it, and did quite well considering the limitations. However, bringing the powerful 6809 together with equally powerful hardware on the Atari and other platforms is just a dream come true.
- Doing something that others said couldn't be done, or wouldn't be done.
- Bring people from different platform camps together, to mix the pot up, so to speak. For years, each group has had its own cliques and personalities. With all of that talent being segregated, I thought that the Liber809 could be one way to bring some of these folks together for greater collaboration.
- See NitrOS-9 used on other hardware platforms. It's a great little operating system, and the fact that it runs on the CoCo, the Dragon, and now the Atari shows just how versatile it can be.
Pretty much every one of these goals has been met to some degree. But this is just the start. Getting the hardware working and proven is one thing. Now the real challenge is to see if people will take it to the next level with software that takes advantage of this new platform.
The Module Directory
The Atari crashed overnight, but I attribute this to two things: the kernel wasn't setting its allocation map to flag out $D000-$D7FF, and the prototype board is a bit flaky. Even the slightest brush against it might cause the system to go nuts.
Anyway, I fixed up the kernel this morning to block out the Atari's I/O range from possible allocation, and moved some code around, saving a few more pages in ROM which gave me room to stick mdir in the bootfile. Here's the result of that command:
 As you can see, Krn is at the top of ROM starting at $F1FA and the other modules are just below that. The I/O being where it is poses some interesting challenges to OS-9, because is expects the bootfile to be contiguous and doesn't care what order the modules are in. We can work around that, but it requires careful planning and placement of modules in the right order to get around the $D000-$D7FF hole.
It looks like we'll be going with a cheaper board making option for the first run, which will undoubtedly help bring the price down. No solder mask and no silk screen, just plain prototype boards. And we'll only make three instead of four. More news on that later.
Anyway, I fixed up the kernel this morning to block out the Atari's I/O range from possible allocation, and moved some code around, saving a few more pages in ROM which gave me room to stick mdir in the bootfile. Here's the result of that command:

It looks like we'll be going with a cheaper board making option for the first run, which will undoubtedly help bring the price down. No solder mask and no silk screen, just plain prototype boards. And we'll only make three instead of four. More news on that later.
Tuesday, February 21, 2012
Forking and Chaining
I spent a bit of time this afternoon getting the video driver VTIO written just enough to get the Write routine working. Fatigue was setting in because I was making some dumb mistakes in my coding, which I eventually caught, but it made for a longer session than I would have liked.
But it was worth it. NitrOS-9 now boots and shows output. This validates that the I/O subsystem, including IOMan, SCF and the VTIO driver are doing their thing.
I stuck the mfree command in the bootfile, so SysGo forks that. You can see the NitrOS-9 banner and the output of mfree in the video below.
What's next? Rest. My 4 day weekend is over and I have work to do tomorrow.
But it was worth it. NitrOS-9 now boots and shows output. This validates that the I/O subsystem, including IOMan, SCF and the VTIO driver are doing their thing.
I stuck the mfree command in the bootfile, so SysGo forks that. You can see the NitrOS-9 banner and the output of mfree in the video below.
Quite The Character
Things are looking better. With some explanation of the inner workings of the ANTIC from the guys on the Atari IRC channel, I've made progress (many thanks to sloopy, tschak, syscall and others... I cannot say enough about these folks and how helpful they are.)
So, a picture is in order.

So, a picture is in order.

Tada! I am now able to display sensible characters on the screen. And boy did I learn a lot about the ANTIC today. Phew....
What's going on here? Well, the VTIO driver is setting up the ANTIC and telling it where the character set is. Due to hardware restrictions, it must reside on a 1K boundary, so I've stuck it up in the kernel for now.
The next step is to launch a process and get its output to the screen in a sensible manner. That will take some work on the VTIO driver.
Monday, February 20, 2012
NitrOS-9 Comes To Life on an Atari...
I spent a little time today slowly bringing up the NitrOS-9 Level 1 kernel on the Liber809. With the sound emission and screen color code, I was able to track the progress of the kernel through the various stages (clearing memory, installing system calls, validating modules, etc) up to the point where it's now opening the /Term device. I have a dummy VTIO driver that pretty much does nothing in the Init routine except tell the ANTIC to show a light purple screen. The next step will be to actually get characters on the screen. For that, I'll need to hit the Atari docs pretty hard.
The bootfile is minimal right now and consists of Krn, KrnP2, IOMan, SCF, VTIO, Term, and Sysgo.
The bootfile is minimal right now and consists of Krn, KrnP2, IOMan, SCF, VTIO, Term, and Sysgo.
Don't Mask Me, Bro!
Another milestone has been reached this morning... the NMI (non-maskable interrupt) has been verified to work. Rybags (from AtariAge.com) kindly posted some code which uses the NMI to increment a counter which is then fed into the graphics and sound hardware. The result is a nice rolling curtain of color bars with a rapidly descending tonal effect.
I had some initial trouble getting it to work, which turned out to be something quite simple. The counter variable was in ROM instead of RAM, so incrementing it had no effect. Doh! After realizing that faux pas, I relocated the variable, and all is working!
One thing I did learn... the 6502's NMI only pushes PC and the condition code register to the stack, while the 6809's NMI pushes all registers to the stack. This behavior doesn't affect the demo, but it's interesting to note.
Sunday, February 19, 2012
Another Small Victory
Not leaving well enough alone, I had to come back in the shop this evening and convert another small test program that I got from an AtariAge.com helper. This piece of code sets up the ANTIC with a display list, which really causes the ANTIC to interrupt the 6809E much more often. The design holds up well though, because the Liber809 acts exactly the same as the 6502C version. Sound is emitted and the screen stabilizes with some graphic skitzzle at the top.
Here's the 6502 code:
*=$8000
.byte 0
;
*= $FFFC
.word reset
.word 0
*= $F000
reset
sei
jmp wait
cld
ldx #$FF
txs ; initialize 6502 mode and stack ptr
inx
txa
cleario
sta $d000,x
sta $d200,x
sta $d300,x
sta $d400,x
dex
bne cleario
lda #3
sta $d20f ; set Pokey to active
ldx #$10
delay
dex
bne delay ; short delay for Pokey to start, probably not needed
ldx #<dlist
ldy #>dlist
stx $d402
sty $d403 ; setup DList pointer
lda #$22
sta $d400 ; DMA mode normal
lda #$f0
sta $d409 ; CHBase at $F000
lda #$a0
sta $d200
lda #$a1
sta $d202 ; set audf1 and audf2
lda #0
sta $d01a ; Colour border/background
lda #$82
sta $d018 ; Colour background
lda #$ca
sta $d017 ; PF1 colour
lda #$a8
sta $d201
sta $d203 ; set audc1 and audc2
wait
jmp wait ; loop forever
dlist
.byte $70,$70,$70,$70
.byte $42
.word screen1
.byte $42
.word screen1
.byte $41
.word dlist
screen1
.byte 0,1,2,3,4,5,6,7,8,9
.byte 10,11,12,13,14,15,16,17,18,19
.byte 0,1,2,3,4,5,6,7,8,9
.byte 10,11,12,13,14,15,16,17,18,19
And the 6809 translation is next. You'll notice that the ANTIC expects the addresses fed to it in little endian format. This means I have to get the pointer to the dlist code, put it in the D register, then swap the two bytes and store that into $D402. Also I've hard-coded the offsets in the dlist itself to be byte swapped. Gotta add byte swapping functions to the mamou assembler.
org $F000
reset
orcc #$50 mask interrupts
lds #$00FF stack pointer
* clear I/O
ClearIO
clrb
loop
ldx #$D000
clr b,x
ldx #$D200
clr b,x
ldx #$D300
clr b,x
ldx #$D400
clr b,x
decb
bne loop
* set POKEY active
lda #3
sta $D20F
* setup DList pointer
leax dlist,pcr
tfr x,d
exg a,b
std $D402
lda #$22
sta $D400 DMA mode normal
lda #$F0
sta $D409 CHBase at $F000
lda #$A0
sta $D200
lda #$A1
sta $D202 set audf1 and audf2
clra
sta $D10A ; color border/background
lda #$82
sta $D018 ; color background
lda #$CA
sta $D017 ;PF1 color
lda #$A8
sta $D201
sta $D203 ; set audc1 and audc2
wait jmp wait
fill $FF,$FF00-*
dlist
fcb $70,$70,$70,$70
fcb $42
* fdb screen1
fcb $0D,$FF
fcb $42
* fdb screen1
fcb $0D,$FF
fcb $41
* fdb dlist
fcb $00,$FF
screen1
fcb 0,1,2,3,4,5,6,7,8,9
fcb 10,11,12,13,14,15,16,17,18,19
fcb 0,1,2,3,4,5,6,7,8,9
fcb 10,11,12,13,14,15,16,17,18,19
fill $FF,$FFF0-*
fdb reset
fdb reset
fdb reset
fdb reset
fdb reset
fdb reset
fdb reset
fdb reset
It's Alive!
"It's Alive!" Remember the movie of the same name that came out in the 70s? Somehow, as a kid I convinced my mother to take me to the Yam Drive-In to see it... but that's another story.
The headline for today is that the Liber809... well, SHE'S ALIVE! This short video shows it hooked up to the Atari XEGS and being fired up. The TV shows colors being cycled and the sound coming from the speaker. The 6809 assembly that makes this happen is below.
So that's where I am now. The next steps are:
- Expand on the test code a bit and gain confidence that things are working well.
- Get several actual prototype boards made so I can get away from using the Frankenstein wire wrap. Gary's working on this.
- Learn more about the Atari 8 bit hardware to see what other cool things can be done.
- Come up with a plan to bring NitrOS-9 to the platform.
org $C000
DelayQuick
clra
d@
deca
bne d@
rts
DelayLong
ldd #$4000
d@
subd #$0001
bne d@
rts
ClearIO
clrb
loop
ldx #$D000
clr b,x
ldx #$D200
clr b,x
ldx #$D300
clr b,x
ldx #$D400
clr b,x
decb
bne loop
rts
SetupPOKEY
lda #3
sta $D20F ; set POKEY to active
rts
SetupSound
lda #$A0
sta $D200
lda #$A1
sta $D202 ; set audf1 and audf2
lda #$A8
sta $D201
sta $D203 ; set audc1 and audc2
rts
fill $FF,$E000-*
SWI3Vct
rti
SWI2Vct
rti
FIRQVct
rti
IRQVct
rti
SWIVct
rti
NMIVct
rti
RESETVct
orcc #$50
lds #$2000
lbsr ClearIO
lbsr DelayQuick
lbsr SetupPOKEY
lbsr SetupSound
clra
xxx
sta $D01A
inca
pshs a
lbsr DelayLong
puls a
bra xxx
wait
jmp wait
* 6809 Vectors
fill $FF,$FFF0-*
fdb $0000 Reserved
fdb SWI3Vct SWI3
fdb SWI2Vct SWI2
fdb FIRQVct /FIRQ
fdb IRQVct /IRQ
fdb SWIVct SWI
fdb NMIVct /NMI
fdb RESETVct /RESET
Shorts Suck
After putting the 74LS74 onto the board and its failure to fire up properly in the Atari XEGS, I decided to walk away from the project for a few days. I was getting tired, and didn't want the fatigue to turn into frustration. At this point, I had invested almost a month of evenings and weekends into the project, and wanted to see it succeed.
A few days later, I came back and reviewed the design. The logic seemed sound, but I had questions. Putting the trusty LogicPort to use, I analyzed the signals of the 6809E and saw that the E and Q clocks were only oscillating when the TSC line was going up and down. The rest of the time, the clocks were dead.
Well, that explained why things weren't working.
I went back, buzzed through each of the connections, checking for continuity, rechecking the wires, and looking for shorts. Nothing stood out. I emailed the snapshot of the LogicPort to Gary, who quickly suggested where the trouble might lie. Sure enough, there was a short that I didn't catch in a critical juncture. After taking out the trusty Weller soldering iron and fixing that, plus a few more possible problem points, I hooked everything up and lo and behold, success! The 6809E was singing at 1.789MHz and running code consistently! No more wandering off when the ANTIC took over the bus. It finally looked like we solved the timing problems!
A Little TLC for the TSC
The Liber809 was coming up in fits and starts. As long as the ANTIC (the Atari chip that wants to take over the bus periodically) was out of the way, the 6809E would run fine, fetching instructions and going its merry way. But when the ANTIC started halting the CPU and grabbing the bus, things went gnarly. Depending on when the XEGS was powered up, I might see a colored screen, or I might not. It was totally inconsistent.
Gary requested a logic snapshot of the 6502C in action, so I got a second 40 pin IC clip wired up to a second set of leads that could easily plug into the LogicPort. Capturing what the 6502C did at reset was very helpful in bringing us to the realization that with the current logic designed to anticipate the ANTIC chip taking the bus, the 6809E was still coming in a cycle too early.
Gary's rework of the design focused on changing how we asserted the TSC (tri-state control) line of the 6809E. Its an input to the 6809E that basically tells it to back off and let someone else carry the bus for the next cycle or so. Our current IC logic used a 74LS04 and a 74LS00 (NAND and inverter chips), but we needed something a bit more elaborate. Gary added a 74LS74, or what is known as a J/K flip-flop to the design to halt the 6809E for another clock cycle and stretched the E and Q clock lines for that cycle as well. The end result was that the 6809E should stay away from the bus long enough for the ANTIC to do its business.
I didn't relish the idea of tearing into the prototype to add another chip. Already, the board was looking pretty ragged. But I knew it was the only way to prove out the design, and so I spent several evenings carefully planning the addition of the 74LS74. Luckily, I was able to scrounge a few from some old boards in a parts bin that I keep around the shop. A few days later, I had the prototype board wired up as per Gary's modifications.


Feeling pretty skeptical that it would work, I prepped the ROM emulator, plugged the prototype in and fired up the Atari XEGS for what seemed like the 100th time. And much to my dismay, I got nothing on the screen.
HALTing Progress
Garbage on the screen doesn't sound like progress, but given that I had nothing prior, I considered it a good sign. But one thing stood in the way of further progress. I wired up the Liber809 prototype in such a way that it was physically impossible to hook up the IC clip from the LogicPort to the 6809E. I was going to have to rewire this thing, and so I began to do just that.
Another weekend spent carefully resoldering and moving wires around yielded a reconfigured prototype board that now had the 6809 prominently sticking up at the top, easily accessible to the IC clip. After hooking everything back up and attaching the LogicPort, the E and Q clock signals showed up perfectly. The Maxim part was doing what it was supposed to do, and doing it well. The 6809 was alive, and although it wasn't causing the XEGS to show a nice colored background and emitting sound, it was doing SOMETHING.
Next, it was time to look at the address lines. When the 6809E comes up, it asserts its address lines in the following manner: $FFFE, grab the byte there, $FFFF, grab the byte there... the 16 bit value is then loaded into the 6809's program counter and execution jumps to that address.
I could clearly see that the 6809 was doing just that, and the $FF00 address looked correct, but after that, things went haywire.
Well, it turns out that the thing we were worried about was in our face. You see, the Atari hardware can take over the address bus at different times, basically telling the CPU to get out of the way using a line called the HALT signal. When Gary came up with the design for the Liber809, he knew that the 6809 would have to cope with relinquishing the bus every now and then to make the other hardware on the Atari happy. Problem was, the method he chose didn't exactly make that happen at the right time. The 6809 was still trying to use the bus when the Atari's hardware was, and it was causing problems.
At least now, with a logic analyzer and some captured data, I was able to give Gary hard data to look at. All he had to do was download the Intronix software on his PC. I could then email him the data that I took from the analyzer, and that worked like a charm. Now all we had to do was analyze what went wrong and how to fix it. No doubt, the circuit would need to be adjusted, but how?
Tick Tock
So where were we? Oh yeah, I've got a shiny new logic analyzer that is really cool, and a prototype of the Liber809 that doesn't do a thing when plugged into the 6502 socket of my Atari XEGS. Time to put these two things together.
The logic analyzer quickly showed the problem: the Q clock, which was being generated by delaying the E clock using the resistor/capacitor (which itself was generated from the PHI0 clock coming from the Atari), wasn't properly formed. Essentially, Q was falling at the same time that E was.
Now you might be wondering what the hell I just said. Well, I'm using the 6809E, not the 6809. There's a difference... the 6809E requires not one, but two clock inputs: E and Q. Both clocks rise and fall, but E rises 1/4 in time AFTER Q does. This timing is critical. If it isn't right, the 6809E doesn't work.
(Aside: so why did I choose the 6809E instead of the 6809? Because I have a few laying around, and that's the same chip the CoCo takes.)
Ok, so I now had a timing diagram from the logic analyzer that I could take to Gary and say "here... look at this." It runs out that the RC timing constant that Gary used to delay the Q clock was not sufficient. We needed a way to "shift" the Q clock by a full 90 degrees, but it also needed to stay up after the E clock fell.
Again, the helpful guys on the AtariAge.com forums came to our aid. One of them suggested we look into the Maxim DS1100Z which takes an input signal and outputs that same signal shifted some amount of time. I did some calculations... the 6502C on the Atari XEGS runs at 1.789MHz. Shifting E for one quarter of a clock cycle turned out to be a 139.6ns delay. And what do you know, Maxim had the DS1100Z-175+ which had a delay of 140ns on one of its taps. Excellent!
Time to go on the Maxim website and get a few free samples. They eventually came in and man were they small!

In the mean time, Gary adjusted the schematic to eliminate the resistor/capacitor and use the DS1100Z. I carefully soldered the wires, being careful not to create any shorts. Once that was done, I hooked up the Liber809 prototype to the Atari XEGS, loaded up the Ostrich II with the 6809 test code, and fired things up. This time I got a screen full of colorful garbage! Something was alive!
Subscribe to:
Posts (Atom)